credit: http://www.xenonzcar.com/z31/DigitalDashRepair.html
The Digital dash was part of an option package that cost $1200. Included in this package was an upgraded stereo and digital climate controls. The digital dashes have a fairly common habit of going bad. Usually it just completely goes out or items start to disappear. Here is a listing of the most Common, and how to fix them.
Testing the Display
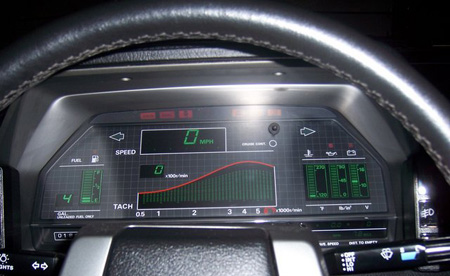
1986 300zx Non Turbo Digital Dash Test

To run the self-diagnostics on the dash do the following:
With the ignition off, hold the two trip odometer buttons in and turn on the ignition (Don't start it), let the buttons go once the diagnostics start and watch for dead segments.
Digital Speedometer reads "0" all the time.
If the speedometer bar and digital display reads "0" all the time chances are the speed sensor has failed or the speedometer cable has broken. The sensor is assembled and then "potted". That is, the ends are sealed with a black epoxy material which, in theory, should make it weather proof. However, as the epoxy ages, it shrinks, cracks or pulls away from the sensor body. It's only a matter of time before water or salt enters and does the nasty.
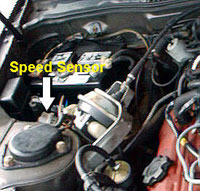
The easiest thing to test is whether or not the cable is good. The speed sensor is a round object mounted to the fender well near the battery with the speedometer cable and red, green, black and yellow wires attached to it (See Image to Right). Remove the cable from the speed sensor first by unscrewing the locking ring. Be sure to watch for a black plastic alignment ring as you pull it apart watch. Don't loose it. Prop the cable up so you can observe the "Square" end of the cable. Put the car in 5th gear and roll the car forwards or backwards 3 or 4 feet. If the cable is good you should see it rotate a half a turn or so. If it turns check the speed sensor next.
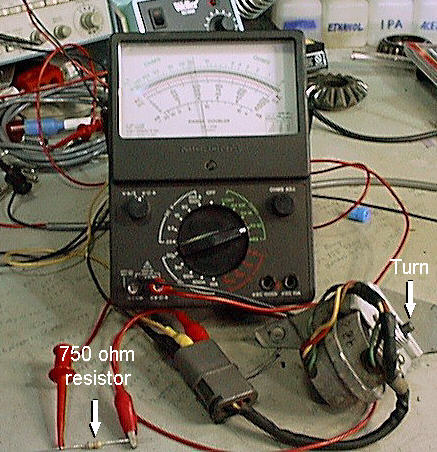
To test the speed sensor you will need small insulated alligator clips, a multi-meter (preferably analog, digital is ok also) and a 5 or 6 volts DC source for bench testing (Click Image at Left). You can use 12 volts from the car battery with a 750 ohm (680-820 will do) current limit resistor in series if the sensor is still in the car. Do not use 12 volts directly! The three wires from the sensor are as follows: BLACK=GROUND, RED=+12VDC, YELLOW=SIGNAL. Attach the alligator clips to the three contacts in the connector ensuring the are not shorting together. Connect the voltage source to the 2 outer clips, ground to black wire and +DC to the red wires. Connect the multi-meter negative to the black wire and positive to the yellow wire. Set the multi-meter to the 10 or 100K ohm range, which ever gives you the best resolution. Slowly turn the shaft of the sensor. If the sensor is good you will see the needle of the sensor swing back and forth. If you are using a digital, the resistance should swing from about 200 ohms to over a meg or infinity. If you have made your connections properly and you see no deflection in the meter, the sensor is likely to be bad.
Digital Dash Display Not On
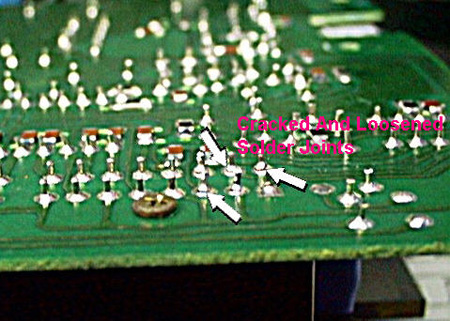
The most common problem is the dash just going out. The power supply unit is the culprit with bad solder joints on the circuit board. Here is the procedure for fixing this problem:
- The power supply for the digital dash is located just above your right knee. Remove the trim panel directly above the drivers' knees. It's the one that the hood release and steering wheel tilt lever pass through.
- The box is above the area where your right knee is when you're driving. It is about 5x5x1 inches. Remove it by removing the 1-10mm bolt and 1-10mm nut holding the power supply. There are two brackets welded onto it which are held in place by one screw each. There are also two wire harnesses connected to it.
The most common problem by far is simply loss of contact. I have heard of solder joints on the circuit board cracking, indeed, a TSB was issued about this and reccomended replacing the unit, about $400 each! On some, the connectors simply weren't making contact anymore, you can twist each pin a little bit with a small pair of pliers. Cutting the connectors off and soldering the wires to the pins themselves would permanently solve the problem. Another common fix is to wedge something between the connectors and the box. This appears to be the most common place for a bad connection.

While you are in there you can also check and clean any corrosion
If all else Fails you can contact Wild Bill at http://www.webwarden.net/wildbill/index.php
Comments
Post a Comment