After reading this, it was pretty amazing, I had to share it!
The Rav 3s engine with it's E250F gearbox (AWD) is excellent for a 4cyl
2L engine, but my concern with this conversion was that the V6 would be
doing those same revs at road speed, and when starting off in the Rav's
dreadful low 1st gear would become annoying pretty quick. Below the
gear ratio's for the Rav E250F & Camry E53;
Transaxles; From the information I've found from various places
regarding Camry, Rav, MR2 & Celica Manual transaxles I've deduced
the following;
What I've ended up doing is swapping the ring gear off of the front/centre E250F differential & putting the camry ring gear onto it. then installing the E250F diff into the camry transaxle. I like the fact that the gearing will be the same as driving the camry & also the gears are a lot heavier than the standard rav trans.


Left to right; E53 Cover plate, E53 Cover plate removed, E250F Transfer box removed,
The E250F has 2 additional Studs for the Transfer box which might be able to be removed & installed on the E53 Trans.


You can see the difference in gear size between 5th gears. Left is E53, right E250F. The 5th gears are interchangeable between gearboxes because they are the same height, spline etc... so if I so desired I'd be able to have the 0.775:1 5th instead of 0.82:1, but would loose the strength of having a stronger gear. There is the possibility of putting the 0.731:1 5th gear from the E153, however that paired with a final drive ratio of 3.625:1 would mean I'd be sitting on 2100rpm at 110kph, which is a little low, even for such a big engine in the rav. I'm keeping the 0.82 gearing in the E53.


Here are the ring gears compared... the teeth on the smaller E53 trans
are beefier & fewer, and diameter is less by about 10mm which you'd
expect going from 4.9:1 to 3.6:1.


Here is the ring gear installed on the AWD Rav Diff. The Manual
suggests boiling the ring gear in water to fit it on which is what I
did, but only got the water up to about 80deg C & the gear dropped
straight on. I was told to run an oxy over the ring gear before reading
the manual, but boiling some water & dropping the ring gear in
seemed to me to be the better option.


Now we need to remove the taper bearings from both the diff & trans cases of both, and swap them over. This is because you should always keep the bearing sets together. I'd suggest at this point that it'd be a good idea to get a new set of bearings, however I kept the same ones because I couldn't figure out how to press the bearings off of the rav diff. You'll need to remove the outer oil seal, then remove the oil baffle (the blue thing) before you can press the bearing halves out. Pressing the bearings out is a very tricky procedure, and you'll need the right tools (75mm bearing puller - which you will need back at the start to pull the 5th gear anyway). I swapped the oil baffle from the E250F to the E53, and you will need to use a E250F oil seal to fit the Rav CV shafts as the camry has different size. Since the cases are physically the same, the oil seal fits perfect.
Here are a couple pics of the jig I made to hold the diff while torquing
the bolts on the diff. The bolt holes I'm using are the service bolt's
around the back of the diff. The service manual suggests clamping the
ring gear in a vice while tightening these bolts, but since there were
some holes there I thought a jig would be the better option.


Case halve goes on with the FIPG gasket. You need to either use the genuine Toyota Red FIPG which is about $40 for the tube or a FIPG that is suitable for use with gear oil. The standard off the shelf stuff, even the high temp red/copper will eventually fail as it's not suitable for use with gear oil. It needs to be specifically for differentials or manual gearboxes. I used the toyota red FIPG.


.jpg) Next is sliding the transfer case into place & doing up the bolts
Next is sliding the transfer case into place & doing up the bolts


Above also shows the engine mounted into the Rav4 subframe.
http://strav3vz.blogspot.com/
E53 to AWD Transmission Conversion
Rav4 E250F
- 1st - 3.833
- 2nd - 1.913
- 3rd - 1.258
- 4th - 0.918
- 5th - 0.775
- Final - 4.933
- Example Speed 110km/h at 3100rpm in 5th gear
Camry E53
- 1st - 3.538
- 2nd - 2.045
- 3rd - 1.333
- 4th - 1.028
- 5th - 0.820
- Final - 3.625
- Example Speed 110km/h at 2400rpm in 5th gear
After a LOT of reasearch, I found that there were a lot of similarities
between all of the toyota E & S manual transaxle families. Both of
mine were E series so I was even more confident that there may be the
possiblity to swap parts between them. Ultimately I wanted to have the
AWD diff out of the Rav 4 put into the camry gearbox, which is exactly
what I've ended up doing!
Research
Although I couldn't find a diagrammatic version of the rav AWD Manual
transaxle & transfer case, I could find an E153 from the AWD 3s-gte
celica.
 |
| Camry 3vz E53 Transaxle |
 |
| 3s-gte E153 Transaxle & Transfer Case |
You can see that the E153 AWD trans - like the E250F - has a front
differential, & centre differential inside the differential case,
then it has 3 shafts inside eachother going through to the transfer
case. the centre shaft goes through to the right hand side to the front
right wheel. The shaft around that goes to a ring gear which drives a
pinion driving to the rear diff at the bottom of the image. The final
outside shaft is connected to the outside of the front/centre diff case
& has a locking hub which locks the 2nd & 3rd shaft together
which is the centre diff lock. You'll see all of this in images in
later posts. The E53 transmission only has a single differential,
however the differential case is the same as the E250F (and E153
presumably).
- S51 from Camry 2.2L & E250F Rav - Weakest gearboxes.
- S53/E53 - I think they are pretty much the same gearbox with different ratios
- The E53 has a longer centre section & heavier gears than the S51/E250F.
- E153 - Even heavier version of the E53 used in the GT4 Celica AWD.
What I've ended up doing is swapping the ring gear off of the front/centre E250F differential & putting the camry ring gear onto it. then installing the E250F diff into the camry transaxle. I like the fact that the gearing will be the same as driving the camry & also the gears are a lot heavier than the standard rav trans.
Dissasembling the E250F & E53 Transaxles #1
Transaxle Comparisons
Below are a couple pictures of the E53 & E250F Transaxles.


You can see from the last image with the E53 on left that the centre
section of the gearbox is 40mm longer than the Rav's E250F trans.
Fortunately the bolt holes for all of the mounting points are in
exactly the same location from the clutch end (left on last picture), so
that all mounts will bolt on & fit up to the Rav perfectly. This
means that the E53 gearbox will be 40mm longer, so may have to modify
the cover in the wheel well for this which is no big deal. You'll also
notice the black 5th gear cover at the right end is pressed steel plate
on the E250 while the E53 has cast aluminium which is a lot thicker.
Transfer Box


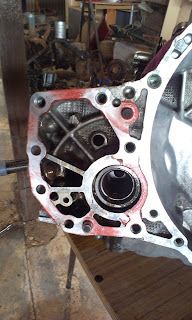
Left to right; E53 Cover plate, E53 Cover plate removed, E250F Transfer box removed,
The E250F has 2 additional Studs for the Transfer box which might be able to be removed & installed on the E53 Trans.
Dissasembling 5th Gear


You can see the difference in gear size between 5th gears. Left is E53, right E250F. The 5th gears are interchangeable between gearboxes because they are the same height, spline etc... so if I so desired I'd be able to have the 0.775:1 5th instead of 0.82:1, but would loose the strength of having a stronger gear. There is the possibility of putting the 0.731:1 5th gear from the E153, however that paired with a final drive ratio of 3.625:1 would mean I'd be sitting on 2100rpm at 110kph, which is a little low, even for such a big engine in the rav. I'm keeping the 0.82 gearing in the E53.
Dissasembling the E250F & E53 Transaxles #2
Main Case Dissasembly
Here are a couple pics disassembling the central transmission.


Since all of toyota's transaxles are all pretty much the same, you can
use the S51, E250F, E53 or E153 or other similar workshop manuals to
help dismantle everything. The Rav4's E250F manual was pretty hopeless,
having short explanations for what to do, and hard to follow part/bolt
names. I ended up using the S51 manual for all of the torque specs as I
was just guessing what bolt was what from the Rav's manual. All of the
torque settings are the same between these transaxles.
Differentials
Left is a pic of the Camry & right is the Rav Diff.


The Camry has a separate row of bolts on the inside to hold the diff
internally together, but the rav only has the bolts around the ring
gear. This means that when you undo the bolts on the ring gear, the
whole diff comes apart... Shown below.


You can see in these pics that there are indeed 2 diffs inside one
enclosure. It's a very clever setup for such a small differential. The
left is with the ring gear still attached & right is after I've
pressed it off. You will need an actual press to get the ring gear off
as it's held on quite tight. You can keep the diff together by
installing service bolts, there's 4 positions behind the ring gear near
the nylon speedo gear where you can put these.


Now we need to remove the taper bearings from both the diff & trans cases of both, and swap them over. This is because you should always keep the bearing sets together. I'd suggest at this point that it'd be a good idea to get a new set of bearings, however I kept the same ones because I couldn't figure out how to press the bearings off of the rav diff. You'll need to remove the outer oil seal, then remove the oil baffle (the blue thing) before you can press the bearing halves out. Pressing the bearings out is a very tricky procedure, and you'll need the right tools (75mm bearing puller - which you will need back at the start to pull the 5th gear anyway). I swapped the oil baffle from the E250F to the E53, and you will need to use a E250F oil seal to fit the Rav CV shafts as the camry has different size. Since the cases are physically the same, the oil seal fits perfect.
E53 Transaxle Reassembly


Now we're ready to re-assemble the trans. First up the diff installing
as per the E250 Manual, you need to install the differential &
output shaft & measure the side bearing preload, & the output
shaft preload. You will need to assemble the transmission without the
FIPG and test the torque that it takes to start turning the diff, then
the output shaft. Mine were close enough to being in spec to not worry
about changing the shims. The shim for the differential side bearing is
hard to change as you need to use the bearing puller to press out the
bearing halve on the oil baffle/oil seal side.


Next up remove the case halve & remove the output shaft. Install
the input & output shaft together as they won't go in separately.
In goes the reverse idler gear & rocker arm, the three selector
shafts & selectors.


Case halve goes on with the FIPG gasket. You need to either use the genuine Toyota Red FIPG which is about $40 for the tube or a FIPG that is suitable for use with gear oil. The standard off the shelf stuff, even the high temp red/copper will eventually fail as it's not suitable for use with gear oil. It needs to be specifically for differentials or manual gearboxes. I used the toyota red FIPG.


AWD Transfer Box
Now there's the problem of installing the bolt studs. The genuine bolt
studs are M12x1.25 68mm long. Unfortunately they were not available
here in AUS, so I've ended up getting 1m of high tensile threaded rod
and making my own studs. The problem is that they were not zinc plated,
so would rust & be pretty hard to get off next time so I got some
"cold galv" & painted them. I'll also paint them after installing
just to make sure it's not going to rust. Left is the original stud in
the E250F Trans, Right are the new high tensile threaded rod studs. I
cut them with a hacksaw - which took a very long time - as I didn't want
heat de-grading the tensile strength of the stud using a friction saw.
This may not be necessary but thought I'd take the precaution.


AWD E53 Transaxle & Engine Assembly
Engine Modifications
Here's where there's a lot of grinding to be done to the block to get
the transaxle to fit. The block and oil pan have to be ground out about
15mm. There is not much left of the lip on the top of the oil pan, but
there is enough to be taken up by RTV Silicone. Just put a lot more in
that area when assembling the oil pan to the engine. Below are a few
pics of how much has to be taken out. The transfer case can be ground a
bit to leave a bit more of the block/oilpan intact.
Here's assembly of the transfercase/transaxle & engine as well as a
fabricated bracket with drawing to connect the transfer case to the
engine. This bracket may not be needed, but the 3S-FE had a bracket to
connect the transfer case to the engine so figured I'd fabricate my own.
You'll need to grind off the little nib on the engine to fit this
bracket.
Exhaust Manifold Mods
The rear manifold collides with the transfer case so the front manifold
has to be used on the rear cylinder bank. this positions it so that the
exhaust header can route down under the transfer case with enough
clearance using a 40NB long radius welding elbow. You could probably
use a donut to get the tight bend radius as well. The manifold then
needs a plug welded into it for the EGR assuming you're still going to
use it.
Above also shows the engine mounted into the Rav4 subframe.
please contact me , I need help because my celica has s53 gearbox and it is too long. I was thinking about doing an hibrid with the first rav4 gearbox . This is my email
ReplyDeletedjpeloloco@gmail.com
Thanks